04 July 2013
Right to Equality..
Consider following code:
First two lines print the output as:
a==b : true
c==d : false
Since primitives are checked for value rather than the address, first check returns true as expected. Similarly, since two different objects are compared in line 2, the outcome is expected.
But what about remaining lines ?
The outcome is:
true // line 3
false // line 4
false // line 5
Why ?
The reason is that Java internally caches the int values between -128 and +127 as a preloaded array.
So if the argument of valueOf function is between -128 and +127 (both inclusive), then an int value from cache array is auto-boxed and returned. Else a new Integer object is created and is returned. This is internally managed by a nested class IntegerCache's cache array.
User can specify the cache size by setting property java.lang.Integer.IntegerCache.high during the JVM startup. However, the value set must be more than 127 since the code in Integer class takes the max value between 127 and the value of this property.
For example, if above code is run by adding this property:
java -Djava.lang.Integer.IntegerCache.high=400 IntegerTest
Output is true for lines 3 and 4 and is false for line 5.

18 May 2010
Sorting data using xsl:sort
In SOA 11g, there is a new XSL-Construct for sorting the input nodes. This is a basic XSLT construct (element) which was missing earlier.
As the w3 standard defines, this construct cannot be used independently, but can be used along with xsl:for-each(or xsl:apply-templates)
It is used to sort the input data based upon some id or text(called as sort-key).
This can be very useful functionality in scenarios where one needs to process some data in a specific sequence.
To use this construct inside a transform activity, add a for-each construct first. Do the required mapping.
Then right-click the for-each and select sort

A dialogue box will open. Add the details like sort-order, data-type for sorting. Click OK.

The construct still shows a big red balloon. To complete the things, just map the appropriate source element to this construct.
Note that one sort construct adds only one parameter. To have sort on basis of more than one parameter, additional sort constructs need to be added.
The source code will show entry of the sort similar to :
<xsl:sort select="tns:age" order="descending" data-type="number"/>
Test and verify. In the example below, I have added two sort statements first for age (descending) and then for id (ascending) :

Note that xsl:sort supports 5 attributes which are :
1. select : Specifies the string which can be used as sort-key
2. lang : Specifies the language for the sort key
3. data-key : Specifies the data type to be used while sorting. Possible values are text, number or a qualified name (either a prefixed name or unprefixed name)
4. order : Specifies the order of sorting. Possible values are ascending, descending
5. case-order : Used in case of data-key="text". Possible values are lower-first or upper-first
As the w3 standard defines, this construct cannot be used independently, but can be used along with xsl:for-each(or xsl:apply-templates)
It is used to sort the input data based upon some id or text(called as sort-key).
This can be very useful functionality in scenarios where one needs to process some data in a specific sequence.
To use this construct inside a transform activity, add a for-each construct first. Do the required mapping.
Then right-click the for-each and select sort

A dialogue box will open. Add the details like sort-order, data-type for sorting. Click OK.

The construct still shows a big red balloon. To complete the things, just map the appropriate source element to this construct.
Note that one sort construct adds only one parameter. To have sort on basis of more than one parameter, additional sort constructs need to be added.
The source code will show entry of the sort similar to :
<xsl:sort select="tns:age" order="descending" data-type="number"/>
Test and verify. In the example below, I have added two sort statements first for age (descending) and then for id (ascending) :

Note that xsl:sort supports 5 attributes which are :
1. select : Specifies the string which can be used as sort-key
2. lang : Specifies the language for the sort key
3. data-key : Specifies the data type to be used while sorting. Possible values are text, number or a qualified name (either a prefixed name or unprefixed name)
4. order : Specifies the order of sorting. Possible values are ascending, descending
5. case-order : Used in case of data-key="text". Possible values are lower-first or upper-first
Changing password for a user
To change password for a user in Oracle Weblogic server :
1. Login to Weblogic administration console (http://<hostname>:<port>/console)
2. Navigate to Security Realms. Select the default realm. This will be myRealm unless there are more than one realms created.
3. In the Settings page, go to Users and Groups > Users
4. Select the user for which you want to change the password.
5. Go to passwords tab. Type new password, confirm it and save.
1. Login to Weblogic administration console (http://<hostname>:<port>/console)
2. Navigate to Security Realms. Select the default realm. This will be myRealm unless there are more than one realms created.
3. In the Settings page, go to Users and Groups > Users
4. Select the user for which you want to change the password.
5. Go to passwords tab. Type new password, confirm it and save.
14 May 2010
Using Custom XPATH Functions
Custom XPath functions provide a great way of handling functionality which cannot be performed using standard set of available functions. Oracle SOA suite comes with many functions which include standard XPath functions as well as SOA and BPEL XPath extension functions. However, many times a situation comes where we wish that so and so function was available.
In such case, arguably custom XPath is the best way to deal with.
In the following steps, a very simple example is taken and implemented as custom XPath function which can be used inside BPEL processes in a typical Oracle SOA Composite.
Example Discussed : A function getSum which takes input two numbers are returns their sum.
Main steps are :
1) Implementing the function logic ( using java.class )
2) Creating a jar file which contains the class and configuration details.
3) Associating the created function with JDeveloper.
4) Associating the function with SOA Suite.
Implementing the function logic
1) Oracle provide a interface "oracle.fabric.common.xml.xpath.IXPathFunction" which can be implemented to create custom classes
This is present in a jar file named "fabric-runtime.jar" which can be found at any of following locations:
<MIDDLEWARE_HOME>\jdeveloper\soa\modules\oracle.soa.fabric_11.1.1
<MIDDLEWARE_HOME>\Oracle_SOA1\soa\modules\oracle.soa.fabric_11.1.1
The logic for the function is incorporated in a java class by implementing this interface.
So in Jdeveloper, create a empty(generic) project. Go to project properties and in "Libraries and Classpath" add this jar file by clicking "Add Jar/Library"

2) Create a new java class file in the project with name as getSum and package as my.custom.
Also select main method which we would use to test the class.
3) In the java class, implement the IXPathFunction interface and the method Call as shown below.
Also add the code in the main method for testing :

4) Test the code and make sure it works fine.
Creating jar file :
1) On your desktop (anywhere) create a new folder and inside this create a folder called code. In this folder create two folders src and META-INF
2) In src folder , copy the java file with correct package. In META-INF , we put the configuration file.
A configuration file is the one which actually associates the Java class with the JDeveloper as well as SOA Suite. Based upon the type of component, the name of the file differs.
For implementation in BPEL, name is ext-bpel-xpath-functions-config.xml (note that for XSLT also name if different)
3) Create a configuration file in META-INF folder with name as ext-bpel-xpath-functions-config.xml. Add following to file:

4) In the main folder, where have two folders - src and META-INF , create a build file (build.xml) which will have tasks for compiling the java code and creating a jar file
The jar file must have the META-INF folder in it along with the class files. A sample build file which I used is shown below:

5) Run ant and create the Jar file.
Associating the created function with JDeveloper :
1) Place the jar file at some standard place on your machine.
2) In JDeveloper, open Tools > Preferences and go to SOA. Add the jar file.

3) Restart the JDeveloper.
4) Create a new SOA project with BPEL , add assign activity.
In the assign activity, create a copy operation and select Expression on input side. In expression builder select "User Defined Extension Functions".The function will appear like this :

5) Function has signature mf:myFunction1() and can be used like: mf:myFunction1("10","20" ) (Note the double quotes around the numbers)
6) Use the function , save and compile the project. While saving, it might show blue line below the function signature, ignore it.
Associating the function with SOA Suite :
1. Go to the location <MIDDLEWARE_HOME>\user_projects\domains\<DOMAIN_NAME>\lib and put the jar file here.
2. Restart the server. On restarting the Weblogic server, the command prompt log will show a message that the jar file is picked up.
3. Deploy the project in JDeveloper and Test.
About the configuration file :
As described above,for using custom XPath functions, we need to have a configuration file. The details about this file can be found in Developer's Guide for SOA suite.
However, for sake of completeness of article, the points are discussed in brief :
1. This file is a XML file and needs to be placed in a folder named META-INF immediately inside the jar file.
2. Name of the file depends on the the usage as below : (Reference : Table B2 in Developer's Guide)
| Name of the component | Name of config file |
| BPEL Process | ext-bpel-xpath-functions-config.xml |
| Mediator | ext-mediator-xpath-functions-config.xml |
| Transformations | ext-mapper-xpath-functions-config.xml |
| Human workflow | ext-wf-xpath-functions-config.xml |
| Generic (All compoents) | ext-soa-xpath-functions-config.xml |
3. The file must follow the schema given in the Developer's guide.
4. Following are the main elements in the file: (Reference : Table B1 in Developer's Guide)
| Element | Description |
| className | Name of the main class which implements the function logic |
| return | Return type. Possible values are string, number, boolean, node-set, tree. |
| params | list of input arguments for function. There is one line per argument . Each parameter specifies the details like name, type using attributes |
A POC for the above example be downloaded from here.
03 May 2010
Adding preference properties in 11g
The main question to ask here is how to get and set the preference properies..?
Well, in SOA 10g versions , this was hardly a question. This was very simple and straightforward in 10g.
In 11g with weblogic server at core, this is still simple, but not so straightforward.
1. Create a composite with BPEL.
2. Go to composite.xml file.
Add a property with name as bpel.preference.myprop1 to the BPEL component definition and set value as 100

Note : The preference properties should always start with prefixes 'bpel' and 'preference' .
So name for a property ABC will actually be bpel.preference.ABC
3. In the BPEL process, add a Assign activity and use the standard ora:getPreference function as in 10g
Assign activity code looks like this :

Note that even though the preference property name is bpel.preference.myprop1 , it is accessed using
ora:getPreference('myprop1'). Also remember to put single quotes as the funciton ora:getPreference expects a String input.
4. Deploy and run the composite. Instance will show that output variable has value as 100.
1. Go to enterprise manager. Navigate to 'System MBean Browser' by right-clicking soa-infra > Administration > System MBean Browser

Note that this is for 11.1.1.1 . For R1 PS-1 or R1 PS-2 , this might be different
2. In 'System MBean Browser' page, search for a MBean with name "oracle.soa.config" and select the first search.Alternately, go to 'Configuration MBeans' > 'Application Defined MBeans' > 'oracle.soa.config'
Inside this Managed Bean, go to 'Server:soa_server1' > SCAComposite > Composite Name > 'SCAComposite.SCAComponent' > BPEL process name.
(BPELProcess1 in this example)

3. MBeans are Java objects which provide a way of managing resources. Each system MBeans's interface has 3 facades - Attributes for setting properties , Operations for methods that can be invoked on that MBean and Notifications that can be used to send event alerts. Out of these the attributes contain the preference properties.
Click the property attribute to open the properties for this BPEL. On this page, preference property 'myprop1' will be visible.

4. Update the property to new value. Click 'Apply' and then 'Return' to go back to the attributes page.
New properties can also be added but keep in mind the naming standard.
5. After updating the property, go back to composite and test the process to verify the new value.
POC for the same can be downloaded from here.
Well, in SOA 10g versions , this was hardly a question. This was very simple and straightforward in 10g.
In 11g with weblogic server at core, this is still simple, but not so straightforward.
Getting value of a preference property :
1. Create a composite with BPEL.
2. Go to composite.xml file.
Add a property with name as bpel.preference.myprop1 to the BPEL component definition and set value as 100

Note : The preference properties should always start with prefixes 'bpel' and 'preference' .
So name for a property ABC will actually be bpel.preference.ABC
3. In the BPEL process, add a Assign activity and use the standard ora:getPreference function as in 10g
Assign activity code looks like this :

Note that even though the preference property name is bpel.preference.myprop1 , it is accessed using
ora:getPreference('myprop1'). Also remember to put single quotes as the funciton ora:getPreference expects a String input.
4. Deploy and run the composite. Instance will show that output variable has value as 100.
Setting value of a preference property :
1. Go to enterprise manager. Navigate to 'System MBean Browser' by right-clicking soa-infra > Administration > System MBean Browser

Note that this is for 11.1.1.1 . For R1 PS-1 or R1 PS-2 , this might be different
2. In 'System MBean Browser' page, search for a MBean with name "oracle.soa.config" and select the first search.Alternately, go to 'Configuration MBeans' > 'Application Defined MBeans' > 'oracle.soa.config'
Inside this Managed Bean, go to 'Server:soa_server1' > SCAComposite > Composite Name > 'SCAComposite.SCAComponent' > BPEL process name.
(BPELProcess1 in this example)

3. MBeans are Java objects which provide a way of managing resources. Each system MBeans's interface has 3 facades - Attributes for setting properties , Operations for methods that can be invoked on that MBean and Notifications that can be used to send event alerts. Out of these the attributes contain the preference properties.
Click the property attribute to open the properties for this BPEL. On this page, preference property 'myprop1' will be visible.

4. Update the property to new value. Click 'Apply' and then 'Return' to go back to the attributes page.
New properties can also be added but keep in mind the naming standard.
5. After updating the property, go back to composite and test the process to verify the new value.
POC for the same can be downloaded from here.
Reading a properties file in BPEL
To read a properties file from BPEL, we can use Java Embedding.
In the java activity, we can read the property and assign the values to BPEL variables using 'setVariableData' function.
Lets have a simple POC to do the same :
1. Create a properties file say "TestProp.properties" and add some properties.

2. Create a simple composite with Async BPEL process and add a Java-embedding activity after Receive activity.
3. Open the Java embedding activity and add following code :

Note that the location for file is set in the first line.
4. Save and close the activity. Open the BPEL source and go to line where the Java embedding is present.
Add following Java import statements before the code for java embedding activity.
<bpelx:exec import="java.io.*"/>
<bpelx:exec import="java.util.*"/>
After adding this , the code snippet looks like this :

5. Save, Deploy, Test.
Make sure that properties file is present and it actually contains the property 'myName'
Otherwise one needs to change the code a bit to handle these scenarios. (Simply add a check to see if value is null)
Sample code for this POC can be downloaded from here .
In the java activity, we can read the property and assign the values to BPEL variables using 'setVariableData' function.
Lets have a simple POC to do the same :
1. Create a properties file say "TestProp.properties" and add some properties.

2. Create a simple composite with Async BPEL process and add a Java-embedding activity after Receive activity.
3. Open the Java embedding activity and add following code :

Note that the location for file is set in the first line.
4. Save and close the activity. Open the BPEL source and go to line where the Java embedding is present.
Add following Java import statements before the code for java embedding activity.
After adding this , the code snippet looks like this :

5. Save, Deploy, Test.
Make sure that properties file is present and it actually contains the property 'myName'
Otherwise one needs to change the code a bit to handle these scenarios. (Simply add a check to see if value is null)
Sample code for this POC can be downloaded from here .
28 April 2010
Creating Data Source in SOA 11g
1. Login to Application Server Console
2. Navigate to Home > Service > JDBC > Data Sources
3. Click "New".
4. Give the name and JNDI location for the data source.
5. Select Database using Database Type drop-down list. To create the data source
for Oracle's Database, keep the default value.
6. Select the database driver accordingly. If Database type is chosen as Oracle, default
driver is "Oracle's Driver(Thin XA) for Instance Connections" which supports global transactions.
To select driver for supporting local transactions, select "Oracle's Driver(Thin) for Instance Connections"
7. Click Next.
8. If a note for XA transaction comes, click Next.
9. Set the connection properties. Give Database name as the Service Name or SID so that
it automatically comes in the connection string
10. Fill host-name, user, password. Click Next
11. Click "Test Configuration" to test the connection. If the database name in step above was something different,
change URL appropriately.
12. Click Next. Select target servers on the screen that appears.
If you do not select any target, data source will not be deployed and you will not be able to use it.
13. Click Finish. Make sure that the Data source appears in the summary of data sources page.
26 April 2010
Using XSL Parameters in SOA 11g
In SOA 11 suite 11g , transformation activity comes with a added functionality which allows to add parameters from the JDeveloper GUI.
Steps are pretty simple :
1) Create a new composite with bpel and add a transform activity to it
2) Open the activity which looks like this :

3) Click the green plus symbol to add a variable
4) Here the first variable that is added becomes the source for the transformation activity.
One can also add more than one variable. These additional variables appear as parameters in the transform file.
5) After adding input variables, add the output variable and click apply to open the xsl mapper.
6) It can be seen that the additional variable(s) appear as parameters in the mapper activity automatically.
No code change is required as such and one can directly map the values from XSL Mapper.

In the source view for the transform file ,following points can be observed :
1) For each source variable , there is a entry in the oracle-xsl-mapper section of xsl file.

2) For the first variable, this entry gives schema location and root element name
3) For all other variables, this entry also specifies name of the parameter with with the variable is referred in the XSL map.
The parameter name follows the naming convention as VARIABLE_NAME.VARIABLE_PART_NAME
4) Also, as expected, each parameter is defined just after the xsl:stylesheet tag.
5) Child nodes in the parameters are accessed using syntax : $param_name+ + XPath expression for the node.
In the BPEL process source, normally, when we add a transform
the function used is ora:processXSLT. But in this case, a different extension function is used.
The function name is doXSLTransformForDoc and namespace is "http://schemas.oracle.com/xpath/extension" which
can be accessed using prefix 'ora'
This function (ora:doXSLTransformForDoc) has following signature :
ora:doXSLTransformForDoc('url_to_xslt',input,['paramQname',paramValue]*)
where
url_to_xslt - Specifies the XSL style sheet URL. (occurrence = 1)
input - Specifies the input variable name. (occurrence = 1)
paramQname - Specifies the parameter QName. (occurrence >= 1 )
paramValue - Specifies the value of the parameter. (occurrence >= 1 , same as paramQname )
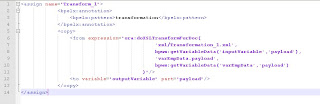
More parameters can be added to this function after the transform is created.
This can be done by
1)Add the parameter name and value in the signature
2)Add source xsd details in the xsl top section along with param name
3)Add param defination after stylesheet element tag
Note that if there are no additional variables present at the time of creating the transform activity, then the
standard processXSLT funtion is used instead of doXSLTransformForDoc.
A simple POC for this can be found here
Adding source variables after the mapping is created
If you try to add a source variable to a transformation activity, after the mapping is created , the new variable is not displayed in the XSL mapper. To overcome this , there are two options : 1. Recreate the mapping 2. Edit the mapper file from back-end to add the new variable
Recreating is simpler option but if you have already number of variables present as the input , then this can mess up sometimes..
Editing the mapper file is a safe way to add new variables without touching the old mapping. Just do these steps: 1. Add the variable using the green plus symbol in the transform activity. Click Apply and then click pencil button to open the XSL Mapper. 2. Go to source view of mapper. Go to the top section where sources are defined in the oracle-xsl-mapper block. In the "mapSources" element go to end and add a entry for the newly added source variable. Entry looks like :

Things you need to modify are : 3. Add the schema namespace to the list of referred namespaces in the stylesheet tag using xmlns tag. It will be something like : xmlns:new="http://www.my.poc.in/br_input"
4. Add the parameter after the stylesheet tag and before the templates :
<xsl:param name = "myVar.payload" />
5. Save , close and re-open the XSL mapper file. Go to design view and verify that the parameter is added correctly.
Steps are pretty simple :
1) Create a new composite with bpel and add a transform activity to it
2) Open the activity which looks like this :

3) Click the green plus symbol to add a variable
4) Here the first variable that is added becomes the source for the transformation activity.
One can also add more than one variable. These additional variables appear as parameters in the transform file.
5) After adding input variables, add the output variable and click apply to open the xsl mapper.
6) It can be seen that the additional variable(s) appear as parameters in the mapper activity automatically.
No code change is required as such and one can directly map the values from XSL Mapper.

In the source view for the transform file ,following points can be observed :
1) For each source variable , there is a entry in the oracle-xsl-mapper section of xsl file.

2) For the first variable, this entry gives schema location and root element name
3) For all other variables, this entry also specifies name of the parameter with with the variable is referred in the XSL map.
The parameter name follows the naming convention as VARIABLE_NAME.VARIABLE_PART_NAME
4) Also, as expected, each parameter is defined just after the xsl:stylesheet tag.
5) Child nodes in the parameters are accessed using syntax : $param_name+
In the BPEL process source, normally, when we add a transform
the function used is ora:processXSLT. But in this case, a different extension function is used.
The function name is doXSLTransformForDoc and namespace is "http://schemas.oracle.com/xpath/extension" which
can be accessed using prefix 'ora'
This function (ora:doXSLTransformForDoc) has following signature :
ora:doXSLTransformForDoc('url_to_xslt',input,['paramQname',paramValue]*)
where
url_to_xslt - Specifies the XSL style sheet URL. (occurrence = 1)
input - Specifies the input variable name. (occurrence = 1)
paramQname - Specifies the parameter QName. (occurrence >= 1 )
paramValue - Specifies the value of the parameter. (occurrence >= 1 , same as paramQname )

More parameters can be added to this function after the transform is created.
This can be done by
1)Add the parameter name and value in the signature
2)Add source xsd details in the xsl top section along with param name
3)Add param defination after stylesheet element tag
Note that if there are no additional variables present at the time of creating the transform activity, then the
standard processXSLT funtion is used instead of doXSLTransformForDoc.

Source type : can be XSD or WSDL Schema details : location, root element name and namespace Parameter name : follow naming convention as mentioned above.
20 April 2010
Sending Emails in 11 g
Sending e-mails is very easy in SOA 11g . Just follow these steps on server side :
1. Login SOA Enterprise Manager (http://<hostname>
+soa_infra_main.jpg)
4. In the Workflow Notification Properties page , update notification mode to "Email"
5. Update email IDs if needed. Note that Actionable Address and Reply-To Address need to be different
5. Update email IDs if needed. Note that Actionable Address and Reply-To Address need to be different
+update+mode.jpg)
6. Click Apply to save the changes.
(This does not actually "apply" the changes.. a managed server bounce is necessary )
If you are using SOA R1 (11.1.1.1) , then it has a notification workflow file named workflow-notification-config.xml.
The file is located at
<MIDDLEWARE_HOME>\user_projects\domains\config\soa-infra\configuration
Note that whatever changes you make get reflected in this file.
(This does not actually "apply" the changes.. a managed server bounce is necessary )
If you are using SOA R1 (11.1.1.1) , then it has a notification workflow file named workflow-notification-config.xml.
The file is located at
+configure+Driver.jpg)
"<MIDDLEWARE_HOME>
as mentioned above)
+notification-file.jpg)
01 September 2009
Composite Sensors
Composite sensors, as the name suggests, are nothing but sensors on the composite level. They can be configured on services and references in any composite. Once configured these sensors then can be used to track the input and output for a composite instance.
Configuring Composite Sensor:
For the current POC, I created a composite with name SensorPOC which takes input a string and returns Hello attached.
Steps for configuring the sensors are similar to that of the good old BPEL process sensors.
In short:
1) Go to composite.xml design view. Click the button for composite sensors. This is present in the top pane.

2) A new window for configuring the sensors will pop up. Select the service for which you want to configure the sensors and click plus sign

3) Name the sensor. Select the appropriate operation. Selecting the operation is important as the variables will be available based on what operation you select.

4) Click the pencil button to choose the type of sensor to be configured. Three types of sensors can be configured - Variables, Expressions and properties. In variable sensors, we can track only values in the variables. In the expression sensors, we can track values of different expressions created using variables and Xpath functions In the properties sensors, we can get values for different properties of that composite.
5) Click Variables.In the XPath window, select the appropriate node and click OK.

If you want to set any filter, you can set it by adding XPath expression in Filter Part. The meaning of filter is that sensor will work only if the filter condition is true. In the POC, I added a filter that checks whether input string has 'a' present.
Note that Composite sensor action is "DBSensorAction". This is a current restriction in Release1.
Click OK. Configuration is done.
Viewing on Console:
1) After deploying the process, open the process on BPEL Console and create an instance.
2) View the instance by clicking the instance-id. This opens pop-up window. In the same window We have a folded node for sensors.Clicking it will show the sensors. Note that sensors will be only activated if the filter condition is met.
Using the sensors as trackers.
In the Instances tab for the composite, we have Search option available. In the right side, we have a button called "Add Fields". Clicking this button will show the list of sensors which can be added. Once the sensor is added, it can be used to filter the instance based on the input value.
08 August 2009
Creating connection factory for database adapters
While configuring a database adapter, we need to specify the JNDI name for the connection factory. At run time, this name is used by the application server to get the Datasource JNDI and connection parameters for the database.
When any adapter is configured in JDeveloper using the adapter configuration wizard, this name is automatically configured as eis/DB/

9) For the source path, if the path is different, then browse and give this rar files location. Click Next.
10) It will ask for reviewing the choices. If values are correct, click Finish. Adapter will be updated and then it will again come back to deployments page. Server restart is not required.
28 July 2009
Installing SOA Suite 11g..
In this article, we would see how to install Oracle SOA Suite 11g R1 (11.1.1.1) on a Windows XP machine.
For installing 11g, minimum 1GB RAM is required. However, it is better to have atleast 2 GB RAM available.
Major steps in the installation are :
1) Installation of Oracle Database 11g
2) Creating Oracle SOA Schemas in the database
3) Installing Weblogic Application Server
4) Installing SOA suite 11g
5) Creating Weblogic domain
6) Starting and Accessing the Weblogic server
7) Installing JDeveloper
Step1 : Installation of Oracle Database 11g
This part is not covered here since many blogs are available which detail out the database installation.For installing 11g, minimum 1GB RAM is required. However, it is better to have atleast 2 GB RAM available.
Major steps in the installation are :
1) Installation of Oracle Database 11g
2) Creating Oracle SOA Schemas in the database
3) Installing Weblogic Application Server
4) Installing SOA suite 11g
5) Creating Weblogic domain
6) Starting and Accessing the Weblogic server
7) Installing JDeveloper
Step1 : Installation of Oracle Database 11g
1)Download Oracle 11g database setup (11.1.0.6 or higher) from here
2)Create a folder in C:\Windows. I used folder name OracleEleven. This will be your installation directory for all the installations.
3)Create two folders in this directory. One with name as Database and one with name as Middleware.
4)Install the database in the Database directory with basic install
Step2 : Creating Oracle SOA Schemas in the database
1)In SOA 10g, the internal database could be used which was OLite. In 11g, we need to use an external database. SOA needs to store the instance metadata and other data into some tables which are created inside the SOA schemas. For this reason, these schema need to be created in the database.
Download the zip file which contains the schemas to be created.
The file is present at this location. Name of the file is "ofm_rcu_win32_11.1.1.1.0_disk1_1of1.zip"
2)Unzip the file in any location in C:
Make sure that you are unzipping the file in C: and not on desktop or my documents.
The reason for this is that if the files are unzipped in a folder say on desktop, then the absolute path for bin folder contains spaces (documents and settings) and hence the setup is unable to find the batch file.
3)Once the files are unzipped, go to the location where they are unzipped.
Go to rcuHome/bin folder and run the batch file rcu.bat.
4)In the installer window, select create repository option. Give the database credentials. Make sure that you are providing user name with SYSDBA role.
5)Repository creation utility will check for pre-requisites. If any warning for character set pops up, click ignore.
6)Once check is done, on the next page give the name of prefix to be used.
This can be any string but usually given as Dev, representing the development environment.
In the component list, select following schemas:
a) AS Common Schemas > Metadata Services
b) SOA Infrastructure > SOAInfrastructure
c) SOA Infrastructure > User Messaging services (Auto selected)
8)Again, after checking prerequisites, on the next screen, provide schema passwords.
Its better to provide same password - welcome1 - for all schemas so that its easy to remember.
9)Ignore table spaces screen and go to next.Create schemas.
Step3 : Installing Weblogic Application Server
1)Download the executable for Weblogic server. It can be downloaded from here.
2)If you have not installed anything, there won’t be any middleware home present.
Select “create a new middleware home” and middleware directory created earlier in step1 as the Middleware home directory.
3)Uncheck the update
4)Select Typical
5)Check the directories
6)Select “All users”
Installation will start. Once the installation is complete, a screen with Done button will appear.
It will also have an option of run quickstart. Unselect the option.
We create the domain using this option, but only after the installation of SOA suite.
Step4 : Installing SOA suite 11g
1)Download the zip file for the SOA suite 11g from here
2)Name of the file is: ofm_soa_generic_11.1.1.1.0_disk1_1of1.zip
3)Unzip the file and go to the folder in command prompt.
4)Run the command setup.exe
This name can be found in file startManagedWebLogic_readme.txt in the domain's home directory. The command is thus startManagedWebLogic.cmd soa_server1
Subscribe to:
Posts (Atom)