28 April 2010

Creating Data Source in SOA 11g


1. Login to Application Server Console
2. Navigate to Home > Service > JDBC > Data Sources
3. Click "New".
4. Give the name and JNDI location for the data source.
5. Select Database using Database Type drop-down list. To create the data source
for Oracle's Database, keep the default value.
6. Select the database driver accordingly. If Database type is chosen as Oracle, default
driver is "Oracle's Driver(Thin XA) for Instance Connections" which supports global transactions.
To select driver for supporting local transactions, select "Oracle's Driver(Thin) for Instance Connections"
7. Click Next.
8. If a note for XA transaction comes, click Next.
9. Set the connection properties. Give Database name as the Service Name or SID so that
it automatically comes in the connection string
10. Fill host-name, user, password. Click Next
11. Click "Test Configuration" to test the connection. If the database name in step above was something different,
change URL appropriately.
12. Click Next. Select target servers on the screen that appears.
If you do not select any target, data source will not be deployed and you will not be able to use it.
13. Click Finish. Make sure that the Data source appears in the summary of data sources page.

26 April 2010

Using XSL Parameters in SOA 11g

In SOA 11 suite 11g , transformation activity comes with a added functionality which allows to add parameters from the JDeveloper GUI.

Steps are pretty simple :

1) Create a new composite with bpel and add a transform activity to it
2) Open the activity which looks like this :


3) Click the green plus symbol to add a variable
4) Here the first variable that is added becomes the source for the transformation activity.
One can also add more than one variable. These additional variables appear as parameters in the transform file.
5) After adding input variables, add the output variable and click apply to open the xsl mapper.
6) It can be seen that the additional variable(s) appear as parameters in the mapper activity automatically.
No code change is required as such and one can directly map the values from XSL Mapper.


In the source view for the transform file ,following points can be observed :

1) For each source variable , there is a entry in the oracle-xsl-mapper section of xsl file.


2) For the first variable, this entry gives schema location and root element name
3) For all other variables, this entry also specifies name of the parameter with with the variable is referred in the XSL map.
The parameter name follows the naming convention as VARIABLE_NAME.VARIABLE_PART_NAME
4) Also, as expected, each parameter is defined just after the xsl:stylesheet tag.
5) Child nodes in the parameters are accessed using syntax : $param_name+ + XPath expression for the node.


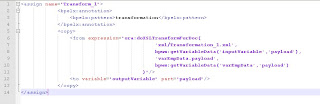
In the BPEL process source, normally, when we add a transform
the function used is ora:processXSLT. But in this case, a different extension function is used.
The function name is doXSLTransformForDoc and namespace is "http://schemas.oracle.com/xpath/extension" which
can be accessed using prefix 'ora'

This function (ora:doXSLTransformForDoc) has following signature :

ora:doXSLTransformForDoc('url_to_xslt',input,['paramQname',paramValue]*)
where
url_to_xslt - Specifies the XSL style sheet URL. (occurrence = 1)
input - Specifies the input variable name. (occurrence = 1)
paramQname - Specifies the parameter QName. (occurrence >= 1 )
paramValue - Specifies the value of the parameter. (occurrence >= 1 , same as paramQname )


More parameters can be added to this function after the transform is created.
This can be done by
1)Add the parameter name and value in the signature
2)Add source xsd details in the xsl top section along with param name
3)Add param defination after stylesheet element tag

Note that if there are no additional variables present at the time of creating the transform activity, then the
standard processXSLT funtion is used instead of doXSLTransformForDoc.


A simple POC for this can be found here


Adding source variables after the mapping is created   

If you  try to add a source variable to a transformation activity, after the mapping is created , the new variable is not displayed in the XSL mapper. To overcome this , there are two options :
1. Recreate the mapping
2. Edit the mapper file from back-end  to add the new variable

Recreating is  simpler option but if you have already number of variables present as the input , then this can mess up sometimes..

Editing the mapper file is a safe way to add new variables without touching the old mapping. Just do these steps:
1. Add the variable using the green plus symbol in the transform activity. Click Apply and then click pencil button to open the XSL Mapper.
2. Go to source view of mapper. Go to the top section where sources are defined in the oracle-xsl-mapper block.  In the "mapSources" element go to end and  add a entry for the newly added source variable. Entry looks like : 


 Things you need to modify are :
  • Source type : can be XSD or WSDL
  • Schema details : location,  root element name and namespace
  • Parameter name : follow naming convention as mentioned above.
3. Add the schema namespace to the list of referred namespaces in the stylesheet tag using xmlns tag. It will be something like :
xmlns:new="http://www.my.poc.in/br_input"

4. Add the parameter after the stylesheet tag and before the templates  :

<xsl:param name = "myVar.payload" /> 

5. Save , close and re-open the XSL mapper file. Go to design view and verify that the parameter is added correctly.


20 April 2010

Sending Emails in 11 g


Sending e-mails is very easy in SOA 11g . Just follow these steps on server side :

1. Login SOA Enterprise Manager
(http://<hostname>:<port>/em)

2. Go to "SOA_INFRA" farm child of your domain
( farm_base_domain > SOA > soa-infra(soa_server1) )

3. Select "Workflow Notification Properties" as shown in diagram :
(soa_infra > SOA Infrastructure > SOA Administration > Workflow Notification Properties)


4. In the Workflow Notification Properties page , update notification mode to "Email"

5. Update email IDs if needed. Note that Actionable Address and Reply-To Address need to be different


6. Click Apply to save the changes.
(This does not actually "apply" the changes.. a managed server bounce is necessary )
If you are using SOA R1 (11.1.1.1) , then it has a notification workflow file named workflow-notification-config.xml.
The file is located at
<MIDDLEWARE_HOME>\user_projects\domains\config\soa-infra\configuration
Note that whatever changes you make get reflected in this file.

7. After clicking apply, click the link which reads "Go to the Messaging Driver Page"

On this page click configure driver button which will take you to User Messaging Email Driver page.
This can also be navigated through
farm_base_domain>SOA>User Messaging Service>usermessagingdriver-email (soa_server1)


8. On this page go to section with heading "Driver-Specific Configuration" . Change values for following properties :
1) OutgoingMailServer (mandatory )
2) OutgoingMailServerPort (mandatory , default : 25)
3) OutgoingMailServerSecurity (optional , default : none)
4) OutgoingUsername (optional , required only if SMTP authentication is mandatory)
5) OutgoingPassword (optional , required only if SMTP authentication is mandatory)

9. Click "Apply" to save the properties.

10. Restart the Managed SOA Server.


Server side changes are done.
Now simply create a new composite with a BPEL process. Add Email activity from the "BPEL Activities and Components" palette
It will open a window to enter details like email id , subject , body. Complete the activity and deploy the project.


Sending emails from pre-configured accounts.

When you open the email activity , you can see that "From Account" has value 'default'.
This value internally corresponds to the from-email address you configured in step 5 above.
In order to send email from some other account , all we need to do is add a entry in the workflow-notification-config.xml.
So open this file (location is :
"<MIDDLEWARE_HOME>\user_projects\domains\config\soa-infra\configuration"
as mentioned above)

Add another entry as shown in the snapshot :


Note that these changes are picked up on run-time and the bounce is not required. Also verify that the command propmpt window for managed server shows some 5-6 messages like :
" INFO: FabricConfigManager.documentChanged DOCUMENT CHANGED: config/soa-infra/configuration/workflow-notification-config.xml "

Once the change is done, then you can use the name used in ASNSConfiguration ('Test ' in the snapshot above) as the value for " From Account" in Email activity.